Friday, May 29, 2009

Alton Brown's Pretzels


I'm a fan of soft pretzels. Warm, chewy, sweetish pretzels. I tried to make some and they turned out very well. The recipe is adapted from Alton Brown's.

This recipe makes 4 pretzels.

Ingredients:
1 oz unsalted butter, melted
3/4 cups water, 46C
1/2 tbs sugar
1 tsp kosher salt
1 tsp instant yeast
2 1/4 cups all-purpose flour
10 cups boiling water
2/3 cup baking soda
1 egg yolk+1 tbs water

Method:

1) Add sugar, salt and yeast to water.
2) Add yeast water and melted butter to flour and mix on low speed until dough comes together. Knead.
3) Put in greased bowl and cover for 1 hour till double up.
4) Preheat oven to 450F/232C and grease baking sheet.
5) Divide dough to 4 portions or 4.5 oz each.
6) Roll out or squish dough and roll up again and lengthen to rope of 24 inches.
7) Shape it and place on baking sheet. Cover with damp tea towel.(Let rise for 5 min)
8) Prepare 10 cups of water with baking soda and boil. Bath pretzels in mixture for 30 seconds. Then place on baking sheet.


9) Brush with egg yolk.
10) Bake for 14 minutes, spinning tray around 7 minutes in.

Tuesday, May 26, 2009

Homemade Noodles


After going through a few websites looking for recipes for homemade noodle, I decided to try one with milk. The noodles were quite springy and very smooth. I will be adding baking soda to make them less dense and perhaps use water instead of milk in my other tries.

This recipe serves 3.

Ingredients:
1 cup all-purpose flour
1 teaspoon salt
1 egg
2 tablespoon milk

Instructions:
1) Put all ingredients into a bowl. Mix until the dough comes together and knead for 10-15 minutes. Rest for 30 minutes.
2) Roll out dough thinly. Noodles will expand when cooked. Douse with lots of flour.
3) Fold or roll the dough into a log and cut into thin strips.


4) Spread out noodles carefully while dousing noodles with flour and let dry for 2 hours.


5) To cook, boil in a pot of water for 10 minutes. Stir often to avoid clumping.

Monday, May 25, 2009

Braised Chicken With Asian Basil


My uncle recently brought us a basil plant from his own garden. I love fresh herbs but unfortunately they do not keep well in my house, dying after a few days even though they're potted. So I scouted the web for a recipe to use up the basil before it shrivels away and came across this one. The dish is quite flavourful though slightly salty. Here's the original recipe:

Braised Chicken With Asian Basil

Ingredients


750 g Chicken Drumsticks & Breast, cut into smaller pieces
8 Cloves Garlic, lightly crushed
8 Slices Ginger
1/3 Cup Sesame Oil
1/3 Cup Chinese Rice Wine
1/4 Cup Light Soy Sauce (I would use 1/3 cup here)
1 Tbsp Dark Soy Sauce
1 Tbsp Sugar
1 Cup Asian (Thai) Basil

Method

Heat the sesame oil in moderate to high heat, browned the chicken pieces.

Then add in the garlic and ginger. Stir until the garlic is light golden in color and fragrant.

Mix in the light soy sauce, rice wine, sugar and the dark soy sauce and continue stirring for about 5 minutes.

Reduce the heat and gently simmer the chicken until they are fully cooked and the sauce is thicken. Finally, add the basil and cook for another minute. Serve immediately.


Sunday, May 24, 2009

Jamie Oliver's Easy Chicken Stock


Chicken stock is called for in a lot of recipes as it provides depth to any dish. It is easily found in supermarkets in bouillon or liquid form. However, in the spirit of experimentation, I decided to make my own chicken stock. There's really nothing to it. I followed Jamie Oliver's Easy Chicken Stock and voila! easy peasy.

Jamie Oliver's Easy Chicken Stock (adapted)

Ingredients:
- 2kg (4 and 1/2 lb) raw chicken carcasses, chopped
- 1/2 head of garlic, unpeeled and bashed
- 5 sticks of celery, roughly chopped
- 2 medium leeks, roughly chopped
- 2 medium onions, roughly chopped
- 2 large carrots, roughly chopped
- 3 bay leaves
- 1 teaspoon dried rosemary
- 2 1/2 teaspoons dried parsley
- 2 1/2 teaspoons dried thyme
- 5 whole black peppercorns
- 6 litres cold water

Instructions:
1) Place the chicken carcasses, garlic, vegetables, herbs and peppercorns in a large, deep-bottomed pan. Add the cold water and bring to the boil, skim, then turn the heat down to a simmer.
2) Continue to simmer gently for 3-4 hours, skimming as necessary, then pass the stock through a fine sieve. Allow to cool for about half an hour, then refrigerate. Once the stock is cold it should look clear and slightly amber in colour.

It will keep in the fridge for about 4 days and in the freezer for 2-3 months.

Wednesday, May 20, 2009

Pita Bread


This is my second attempt at making pita bread. The first time, for some reason, my pita breads refused to puff up. This time, they rose quite well, though still not well enough. I followed the recipe in The Fresh Loaf. Here is the recipe with some adjustments.

Pita Bread
This recipe makes 4 pitas

1 1/2 cups white flour
1/2 cup wholemeal flour
1/2 teaspoons salt
3/4 tablespoon sugar
1 teaspoons instant yeast
1/2 cup water, roughly at room temperature
1 tablespoon olive oil, vegetable oil, vegan butter, or shortening

1) Mix the yeast in with the flour, salt, and sugar.
2) Add the olive oil and 1/2 cup water and stir together with a spoon.
3) All of the ingredients should form a ball. If some of the flour will not stick to the ball, add more water. Once all of the ingredients form a ball, place the ball on a work surface, such as a cutting board, and knead the dough for approximately 10 minutes. If you are using an electric mixer, mix it at low speed for 10 minutes. (The purpose of kneading is to thoroughly combine the ingredients and to break down the flour so that the dough will become stretchy and elastic and rise well in the oven. A simple hand kneading technique is to firmly press down on the dough with the palm of your hand, fold the dough in half toward you like you are closing an envelope, rotate the dough 90 degrees and then repeat these steps, but whatever technique you are comfortable using should work.) When you are done kneading the dough, place it in a bowl that has been lightly coated with oil, rolling the ball of dough around in the bowl so that it has a light coat of oil on all sides. Cover the bowl with plastic wrap or a damp kitchen towel and set aside to rise until it has doubled in size, approximately an hour.
4) When it has doubled in size, punch the dough down to release some of the trapped gases and divide it into 4 pieces. Roll each piece into a ball, cover the balls with a damp kitchen towel, and let them rest for 20 minutes. This step allows the dough to relax so that it'll be easier to shape.
5) While the dough is resting, preheat the oven to 250 degrees Celsius. If you have a baking stone, put it in the oven to preheat as well. If you do not have a baking stone, turn a cookie sheet upside down and place it on the middle rack of the oven while you are preheating the oven. This will be the surface on which you bake your pitas.
6) After the dough has relaxed for 20 minutes, spread a light coating of flour on a work surface and place one of the balls of dough there. Sprinkle a little bit of flour on top of the dough and use a rolling pin or your hands to stretch and flatten the dough. You should be able to roll it out to between 1/8 and 1/4 inch thick. If the dough does not stretch sufficiently you can cover it with the damp towel and let it rest 5 to 10 minutes before trying again. After rolling out, rest the dough for 30 minutes.

7) Open the oven and place as many pitas as you can fit on the hot baking surface. They should be baked through and puffy after 3 minutes. It should start forming bubbles after about a minute of baking.

Serve by cutting the pita breads in half to make a pocket for your filling.

Tuesday, May 19, 2009

Bee Koh Moy (Black Glutinous Rice Pudding)


Bee Koh Moy is a thick, creamy dessert made with nutty black glutinous rice. It is normally eaten with a spoonful of coconut milk. It is very easy to make. It's cooked the same way as one would rice pudding; by merely boiling.

The portion of rice:water is 1 cup:1 1/2 cups. After the rice is soft, add in sugar to taste. Serve warm with a spoonful of coconut milk.

Monday, May 18, 2009

Loh Mai Kai (Glutinous Rice with Chicken)


Loh Mai Kai can be bought from dimsum shops. It's terribly oily however and the filling of 1 chicken, 1 pork, 1 chinese sausage slice and 1 mushroom slice leaves a lot to be desired. So I decided to make my own with plenty of meat and mushrooms, with less oil!

Ingredients
250g glutinous rice
1/3 cups water
100g chicken meat
50g lean pork meat
1 Chinese sausage (lap cheong), thinly sliced
10g black Chinese mushrooms, soaked and cut into thin slices
5 shallots, sliced

Seasoning (A):
1 tsp light soy sauce
1 tsp sesame oil
1 tsp oyster sauce
1 tsp ginger juice
1 tsp sugar
1/4 tsp pepper
1/4 tsp salt
1/2 tsp Shao Hsing Hua Tiau wine
1/2 tsp dark soy sauce
1 tsp oil
1 tsp cornflour

Seasoning (B):
1 1/2 tsp light soy sauce
1/4 tsp pepper
1 tsp sugar
1/2 tsp salt
2 Tbsp oil
1 tsp sesame oil
1 tsp dark soy sauce
1/2 tsp Chinese five spice powder

Instructions
1) Wash glutinous rice, then soak it for two to three hours.
2) Cut chicken and pork meat into slices. Marinate with seasoning (A) for about one to two hours.
3) Heat oil in a wok and saute shallots till fragrant. Add mushroom slices and stir fry quickly then dish up. Add cooked glutinous rice and seasoning (B) and water. Stir fry well for five minutes.
4) Grease four medium­-size rice bowls. Add some fried shallots and mushroom slices, a few slices of Chinese sausages and seasoned chicken and pork slices. Fill up with glutinous rice and enough water to barely cover the rice and press down with a ladle.
5) Steam for 30­-40 minutes. Turn over the rice bowl onto a plate and serve Loh Mai Kai with chilli sauce.


Friday, May 15, 2009

Delectable Brownies


I remember the first time I made brownies. I just came back from university and was in one of my baking phase. I passed a few along to my relatives and my cousin (bless her!) told me she loved it. I still have that old recipe but I am going to try out new ones to compare and contrast. This particular one makes very moist brownies, with quite an intense chocolate flavour. I don't like my desserts very sweet, so these brownies are just nice for my tastebuds. Put in more sugar if you like very sweet desserts. Serve warm with a scoop of ice cream.

Yields 8 big brownies

Ingredients:
1/2 cup and 2 tablespoon flour
1/4 teaspoon salt
1/2 Tablespoons dark cocoa powder
5.5 ounces quality sweetened dark chocolate, chopped coarsely
4 ounces butter (1/2 stick)
1 tsp instant coffee granules
1/4 cups sugar
2 tablespoon light brown sugar
3 large eggs, room temperature
1 teaspoon vanilla extract
1/2 cup walnuts, chopped (optional)

Instructions:
1) Preheat oven to 177 degrees.
2) Butter the sides and bottom of a glass or light colored metal pan 8.5x6x2.5 pan.
3) In a medium bowl, whisk together the flour, the salt, and cocoa powder. Add in the walnuts. Prepare a large sized double boiler. Place the chocolate, the butter, and the instant coffee granules in the bowl of the double boiler and stir occasionally until the chocolate and butter are completely melted and combined. Turn off the heat, but keep the bowl over the water of the double boiler and add both sugars. Whisk the sugars until completely combined and remove the bowl from the pan. Mixture should be room temperature.
4) Add two eggs to the chocolate/butter mixture and whisk until just combined. Add the remaining egg and whisk until just combined. Add the vanilla and stir until combined. Do not over beat the batter at this stage or your brownies will be cakey.
5) Sprinkle the flour/cocoa/salt/walnut mix over the chocolate. Using a spatula fold the dry into the wet until there is just a trace amount of the flour/cocoa mix visible.
6) Pour the mixture into the pan and smooth the top with your spatula. Bake the brownies for 25 minutes (rotate the pan half­way through baking) and check to make sure the brownies are completely done by sticking a toothpick into the center of the pan. The brownies are done when the toothpick comes out with a few moist crumbs.

Cool the brownies completely before cutting and serving.


Wednesday, May 6, 2009

Malaysian Chicken Curry


Malaysians love their curry. Indian, Chinese and Malay curries are equally tasty. It great eaten with rice, rotis, or western type bread. I made mine last night with French bread to swab up every little bit of the delicious curry. The quality of the curry lies on the type of curry powder you choose to use.

This recipe yields 4-6 servings

Ingredients:
1 chicken, cut into small parts
5 garlic, finely chopped
3 inch ginger, finely chopped
1 big onion, finely chopped
1 star anise
1 cinnamon stick
4 cloves
6 tbsp chicken curry powder, mixed with water to form a thick paste
1 1/2 cup whole milk (most curries are made with coconut milk)
6 potatoes, cut into chunks
Salt, to taste

Instructions:
1) In a hot pot, pour in a generous amount of oil (about 1/2 cup). When the oil is hot enough, add in garlic, ginger and onion. Stir for 30 seconds.
2) Add in star anise, cinnamon stick and cloves. Stir all ingredients until golden brown.
3) Add in curry paste. Stir regularly until oil becomes separate from the paste.
4) Add in the chicken. Stir until all is coated with the paste.
5) After 5 minutes, add in milk and stir well. Add in water to obtain the right consistency depending on your taste and preference.
6) Add potatoes and salt. Cook until chicken and potatoes are soft and tender.
7) Serve with rice or bread.

French Bread


French bread (the authentic kind) is one of the toughest bread to bake at home. There are a lot of tips that can be found online. The following recipe is pretty easy to follow and does not require poolish or a slow rising time. Although this is supposed to result in less tasty bread, I felt it turned out pretty good. However, the crust is not as crispy and thin as it should be.

This recipe yields 1 loaf or 2 baguettes.

2 1/4 teaspoons instant yeast
1 cup warm water
2 teaspoons salt
About 4 cups unbleached white flour
Corn meal to put under dough on pan
1/2 egg white mixed with 1/2 tablespoons water to brush dough before cooking.

Mix yeast, salt, water and 2 cups of flour. Beat by hand or mixer for two minutes. Add 1 more cup flour. Beat 2 more minutes. Add 1 more cup flour and mix with hand, adding more flour until stiff enough to knead and handle. Knead for 8-10 minutes.

Put dough in greased bowl, turn over and cover. Let rise in warm place until doubled. Punch down, cut into 2 parts depending on the size of loaf you want. Make long loaf. Sprinkle cooking sheet with cornmeal, put on dough, let rise 30 minutes. Make several slashes diagonally across the top of the loaves, brush with egg white. Put loaves into a cold oven and set a pan of very hot water in the bottom. Turn on oven to 205C. Bake 35-40 minutes (slightly less if making smaller loaf). Towards end, crack oven door with spoon to dry out oven for a crispier loaf.

Please be aware that some people experienced oven malfunction after steaming.

Monday, May 4, 2009

Mieng Kham


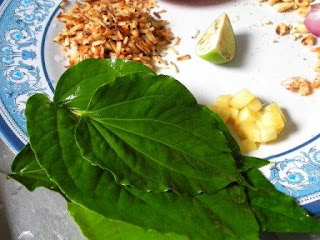
One of my favourite treats from Thailand is Mieng Kham. When I first came across Mieng Kham in Thailand, they cost RM1. For the longest time, the only places you could find this delectable appetizer in Penang, were in restaurants where they charge about RM10 for a set. Nowadays however, there are a few people selling Mieng Khams in Penang's wet markets at RM2 a packet.

It's rather easy to prepare. First, you get hold of the betel leaf and then pile on the toasted coconut, ginger, dried shrimp, roasted peanut halves, ginger, shallot, and lime. Then pour on the syrup. Wrap the leaf around the ingredients and pop it into your mouth. Yummy!

Parisian Bagels


I love bread. Any and all kinds. I've never had bagels before so I thought I'd make one. As I've never had any professionally made ones, I have nothing to compare mine to. However, I'd go so far as to say that they were terrific! Flavourful, chewy and crunchy, warm.. great eaten with butter and jam, and also poached eggs.

This recipe yields 10 bagels, adapted from Jo Goldenberg's Parisian Bagel

3 1/2 cups bread flour [I ran out of bread flour and used half all­-purpose flour]
1 3/4 teaspoon instant yeast
2 1/2 tablespoons, sugar
1/2 tablespoon, salt
1 1/2 cups, hot water (about 50 degrees)
3 litres water
1 1/2 tablespoons sugar
1 egg white – beaten with 1 teaspoon, water
cornmeal for sprinkling on the baking sheet

Instructions:
1) In a mixing bowl measure 3 cups of the flour and stir in all the remaining dry ingredients. Pour in the hot water, and stir vigorously with a plastic spoon for about 2 minutes.
2) Add the remaining half­ cup of flour, a little at a time, stirring by hand. When the batter becomes thick and heavy, lift the dough from the bowl and place it on a lightly floured work surface for kneading by hand.
3) Knead the dough for about 10 minutes. Add flour as needed if the dough is sticky in your hands.
4) First Rising: When dough is kneaded enough, place it in an oiled mixing bowl, cover the bowl tightly with plastic wrap, and set aside at room temperature until it has doubled in volume – about 1 hour.
5) Near the end of this rising time, bring the 3 litres of water to the boil in a large saucepan. Add the sugar; then, reduce the heat and leave the water just barely moving – at a slow simmer.
6) When the dough has doubled in volume, turn it out onto a lightly floured work surface and punch it down with extended fingers to remove excess gas.
7) Divide the dough into 10 pieces (each will weigh about 3­4 ounces). Shape each piece into a ball. Allow the balls to stand and relax for a few minutes – then flatten each one with the palm of your hand.
8) With your thumb, press deep into the center of the bagel and tear the depression open with your fingers. Pull the hole open, pull it down over a finger and smooth the rough edges. It should look like a bagel! Form all of the bagels and place them on your work surface.
9) Cover the shaped bagels with wax paper or parchment paper. Leave them
at room temperature just until the dough has risen slightly – about 10 minutes (this is called a “half proof”).
10) Preheat the oven to 400 degrees.
11) Grease a baking sheet with shortening (or use a non­stick baking sheet, or line a baking sheet with “Silpat” or similar material) and sprinkle the baking sheet with cornmeal.
12) Into the gently simmering water prepared earlier, slip one bagel at a time (use a large skimmer, and gently lower them into the water). Simmer only 2 or 3 bagels at a time – do not crowd the pan. The bagels will sink and then rise again after a few seconds. Simmer gently for one minute, turning each bagel over once during that time. Lift each bagel out of the water with the skimmer, drain briefly on a towel, then place each bagel on the prepared baking sheet. Repeat until all bagels are simmered, drained and on the baking sheet.
13) Brush each bagel lightly with the egg­ white­-water mixture.
14) Place the baking sheet on the middle rack of the preheated oven for 25­30 minutes. When brown and shiny, remove the finished bagels from the oven. Place the bagels on a metal rack to cool.